Projects are a way to organize and share specific documents with other users in Essentia AI. The number of projects that can be created per account is based on their subscription level. The following instructions covers how to work with projects.
Access My Projects
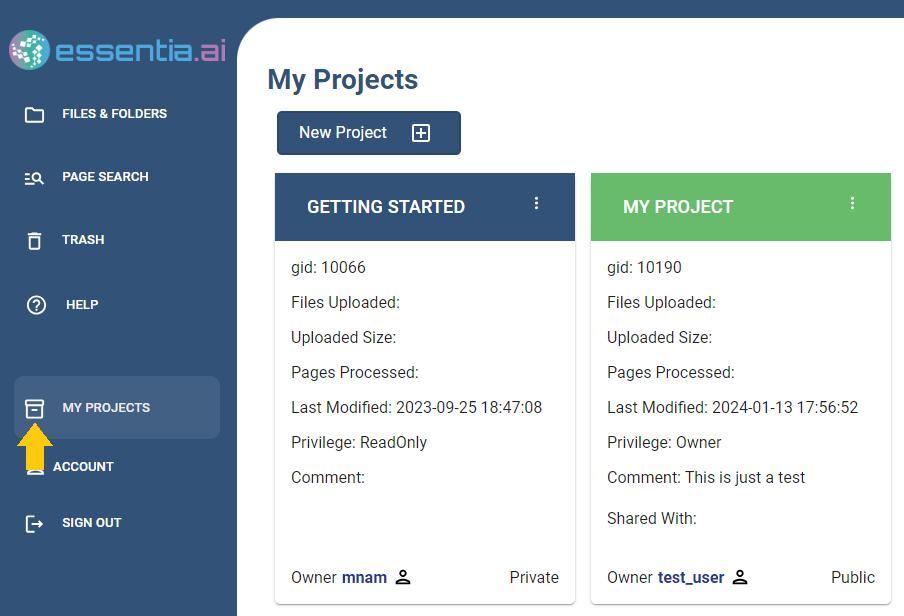
1. Click on My Projects in the left menu to view a list of project cards.
If this is the first time logging in, you'll notice there is a default project already in place labeled Getting Started. All accounts have access to the Getting Started Project. This is a shared project that contains information about how to use Essentia AI. It is a read only project so users can view or download pages or files, but can not add, delete or modify to this project.
Tip: Clicking on the name of any project card will make that the current active project you are working in.
Create New Project
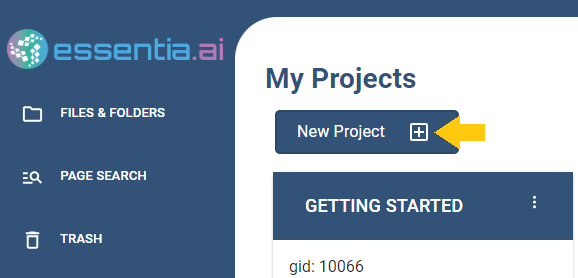
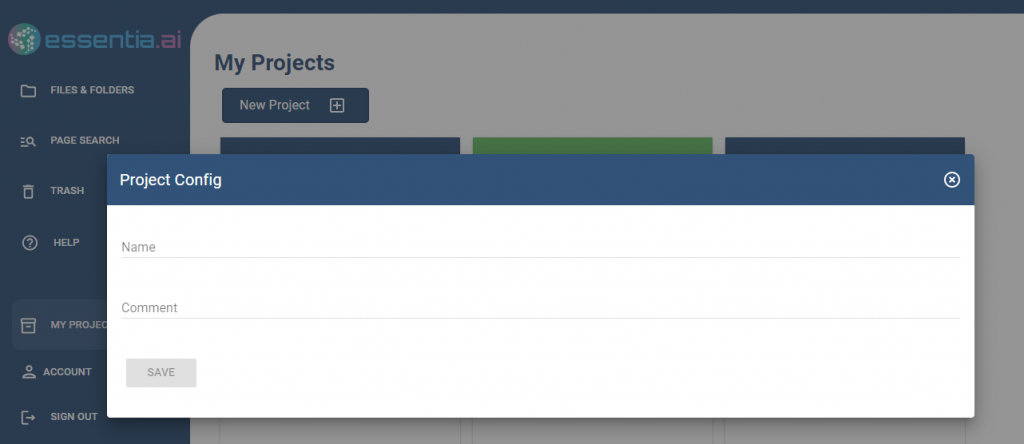
1. Click on the plus [+] icon above the project cards on the My Projects page to open the Project Config box.
2. Enter a name for your Project. Optionally, you can add any comments here to help you distinguish the project. Click Save. The new project card will now display on the home page.
Customize Project Settings
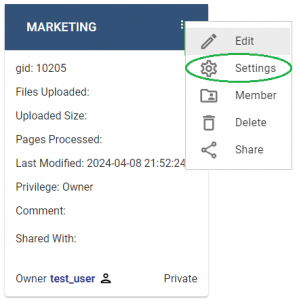
1. Click on the 3 dot icon in a project card and select the Settings option to open the Setting Config box.
2. The Setting config box enables you to customize your project settings.
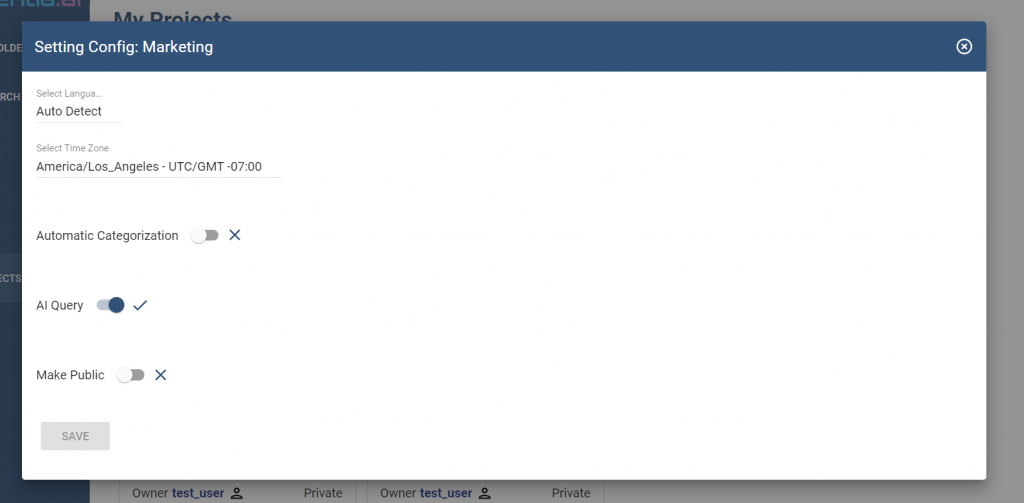
Among the options you can customize are:
-
- Select Language - The language selector enables you to pick language for performing OCR. This means that if you want to extract text from documents written in Japanese characters, then you can select the Japanese option here. If you choose the Auto Detect selection, then Essentia will automatically detect the language in your documents. The languages supported at this time are English, Japanese, Spanish, Russian, Portuguese, French, Italian, German, Chinese (traditional and simplified) and Korean.
- Select Time Zone - This will determine time stamps seen in the Explorer and Projects tables and also what times reports or alerts are delivered.
- Automatic Categorization (beta) - Enabling this setting will make auto categorization of specific types of documents in your project. The types of categories include invoice, agreement, receipt, and other.
- AI Query (beta) - Enabling this setting will make the documents in this project accessible to the AI chatbot which allows you to be able to interact in a ChatGPT manner with the content in your documents.
- Make Public - Enabling this setting will make a project public, meaning that the files and the content in those files can be accessed by anyone who has a link to that project even if they don't have an Essentia account.
When you are finished with customizing your Project settings, click on the Save button.
Adding Members
1. To share or add members to a project, click on the 3 dot icon and select the Member option.
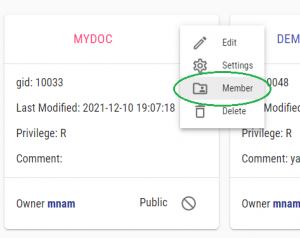
2. The Member Config box lets you add members by entering their username. Members must have an existing Essentia AI user account in order to be added to a Project.
3. If the member account has been verified and found, then you will be given the option to choose the Access Privilege of Owner, Read & Write, or Read Only.
-
- Owner privilege means that a member has full administrative access to this project including settings.
- Read & Write privilege means that a member can also upload documents to the explorer and add tags or comments to documents after running searches.
- Read Only privilege means that a member can view documents in the Explorer as well as Run Searches only using existing tags and comments.
4. Optionally, you can specify specific folders that you want to limit access to a member by selecting from the Folder Location dropdown. Please note that if Owner privilege is assigned to the member, then folder selection is not available.
Public Projects
By default, projects are private, meaning only the creator of the project and any members assigned to it can view the contents and interact with it.
It is also possible to make a project public, meaning that the files and the content in those files can be accessed by anyone who has a link to that project even if they don't have an Essentia account.
Tip: Public project cards have green backgrounds while private projects have a blue background.
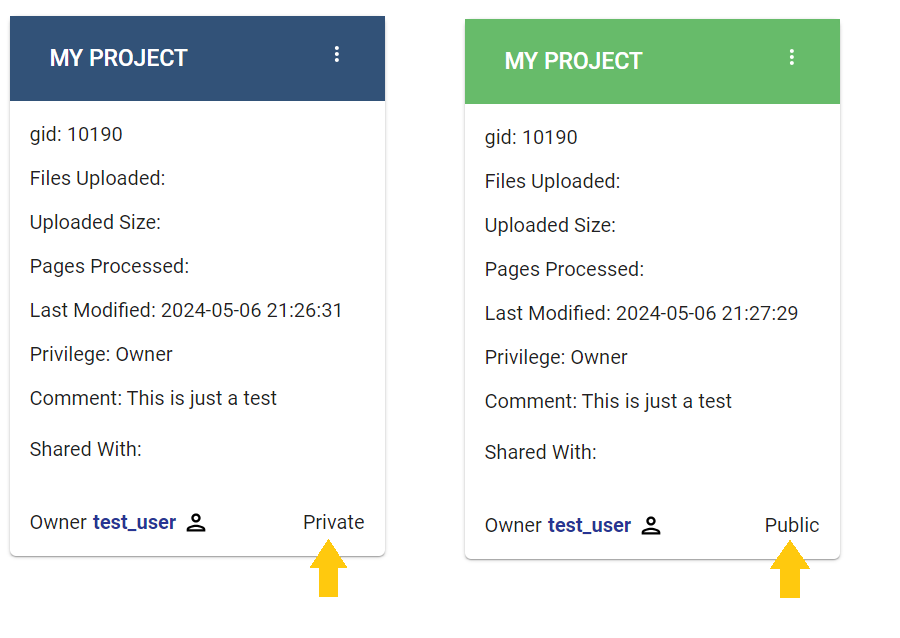
In order to make a project public, access the settings configuration for a project and select the Make Public option. To make a project private again, you would just deselect the option under settings.
Once a project is made public, you can get a shareable link by clicking on the 3 dot icon and selecting the Share option.
In order to begin working with your documents you need to first upload them into a project workspace by selecting the project name.
Upload Files
1. After you've selected a project, access the Files & Folders option in the left menu.
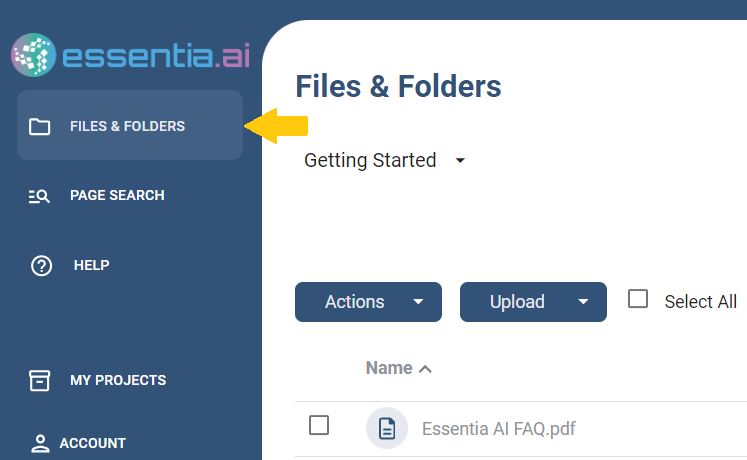
2. Click on the Upload button as shown below and select to upload either Files or Folders from your local storage.
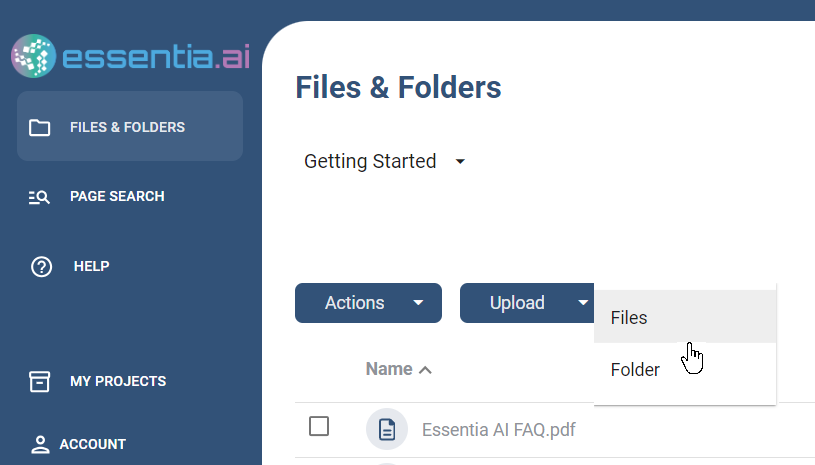
3. Choose the files or folders to upload.
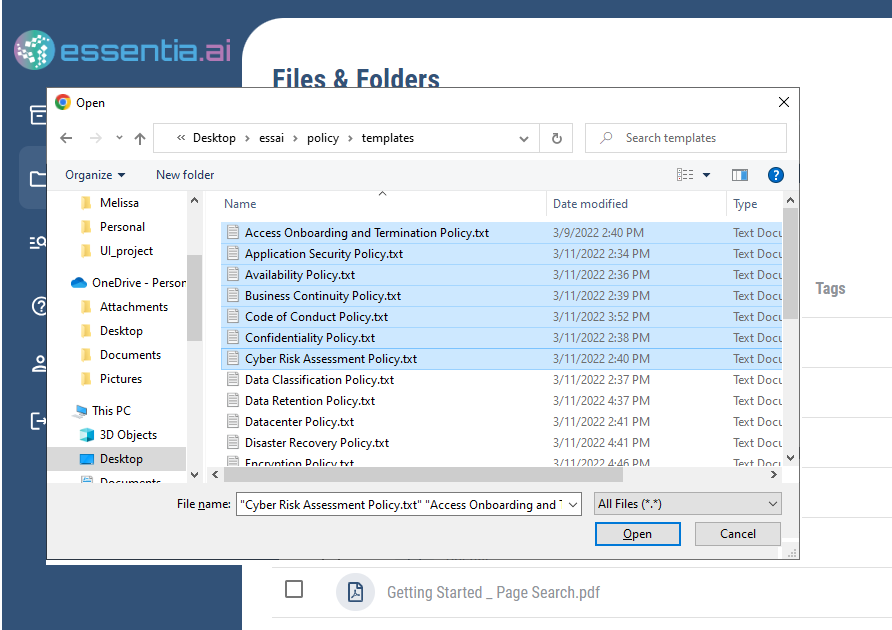
Tip: You can select multiple files using ctrl+click or shift+click.
Files must be text (e.g. - docx, xlsx, txt), image (e.g. - png, jpg, gif) or pdf in order to be processed with OCR.
4. Click on Upload to add your files. The upload progress is shown with a progress bar. Files that have successfully uploaded will have a check mark by their file name. Optionally, add a Note for this batch of uploads for later reference or search.
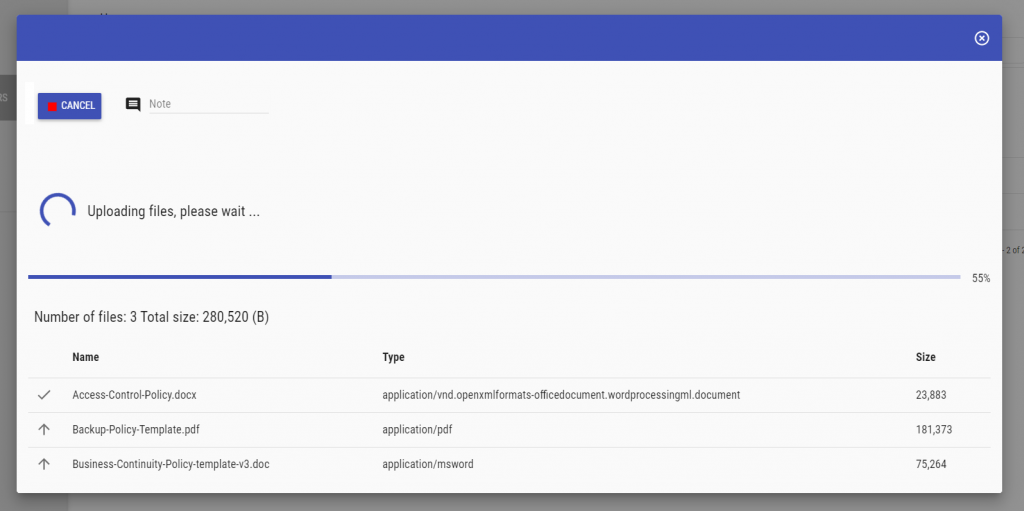
5. After uploading your files, Essentia AI will need to process and extract text information via OCR. This process can take a few seconds to a few minutes depending on the number of files and the overall size of each file.

To verify at what stage of processing your file is currently at, view the status column and the appearance of the status indicator for your file. The possible indicator states are the following:
![]() - If your file has been successfully processed by the OCR engine, the status indicator will be full green bar.
- If your file has been successfully processed by the OCR engine, the status indicator will be full green bar.
![]() - If the status indicator is one third filled green bar then it has probably only recently been uploaded and is still being processed.
- If the status indicator is one third filled green bar then it has probably only recently been uploaded and is still being processed.
![]() - If the status indicator is two thirds filled green bar then the file has been processed and can be viewed as well as the content is searchable in the Page Search. However, it is not yet ready for use with the AI assistant.
- If the status indicator is two thirds filled green bar then the file has been processed and can be viewed as well as the content is searchable in the Page Search. However, it is not yet ready for use with the AI assistant.
![]() - If the status color is a full yellow bar, then there was a problem with processing this file. Click on the status indicator and it will display the issues with processing this file.
- If the status color is a full yellow bar, then there was a problem with processing this file. Click on the status indicator and it will display the issues with processing this file.
The Files & Folders Actions submenu lets you select a variety of options for managing both files and folders.
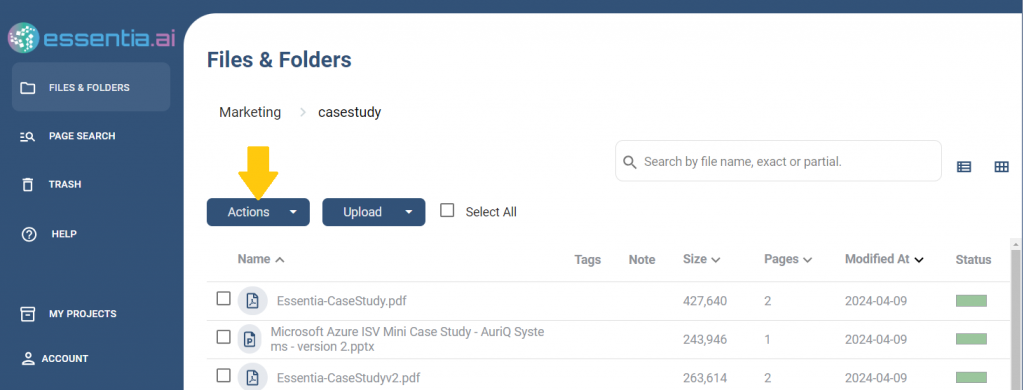
To access the Actions submenu click on the Actions button and it will open to show the following options.
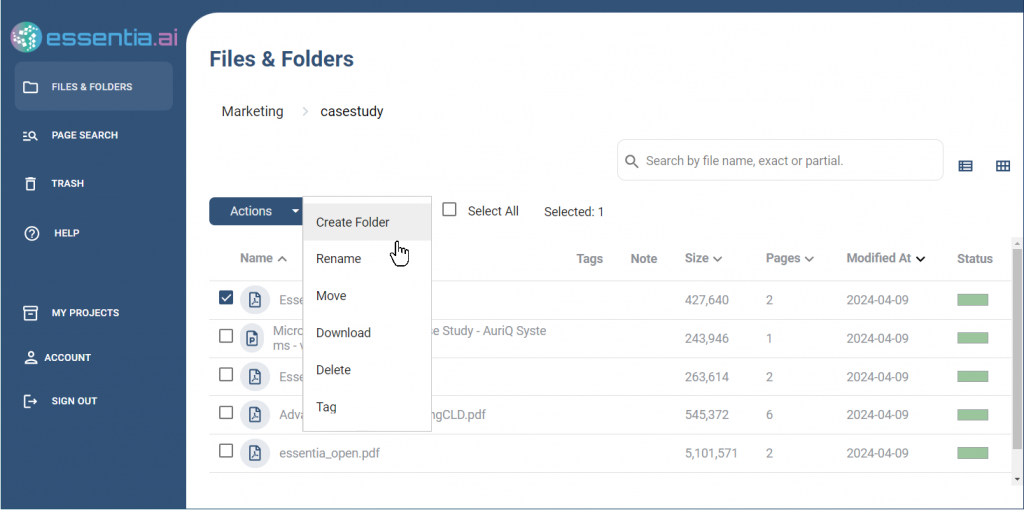
In the figure shown above, notice that checkbox next to one of the file names has been selected. If at least one file or folder checkbox has not been selected, then the only action accessible will be the Create Folder option.
The Actions options allow you to perform the following:
- Create Folder - Add a new folder(directory) under the currently selected folder.

- Rename - Rename the selected file or folder. Only a single file or folder can be selected with the Rename option.

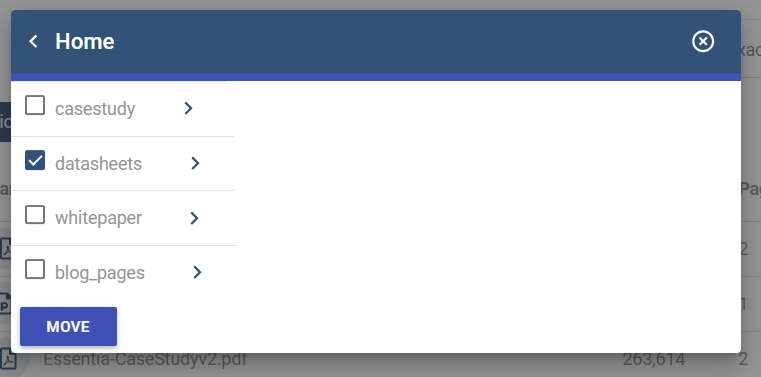
- Move - Move the selected file(s) or folder(s) under a different folder(directory). Use the left and right arrows to navigate between folders. Select the folder by clicking the checkbox and then click the Move button.
- Download - Download the selected file(s) or folder(s) to your local storage.

- Delete - Delete the selected file(s) or folder(s). Deleted files and folders can still be recovered from the Trash if deleted by mistake.
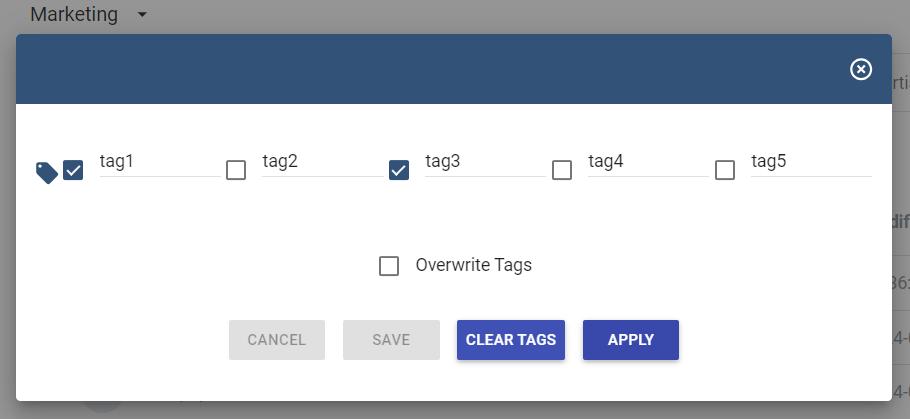
- Tag - Apply tags to selected file(s) or folder(s). Tags are a way to categorize groups of file or folders that can be used to filter search results.
The File Search tool allows you to search for files and folders within a Project. Searches can be based on file or folder names. The File Search tool is only accessible from the Files and Folders page.
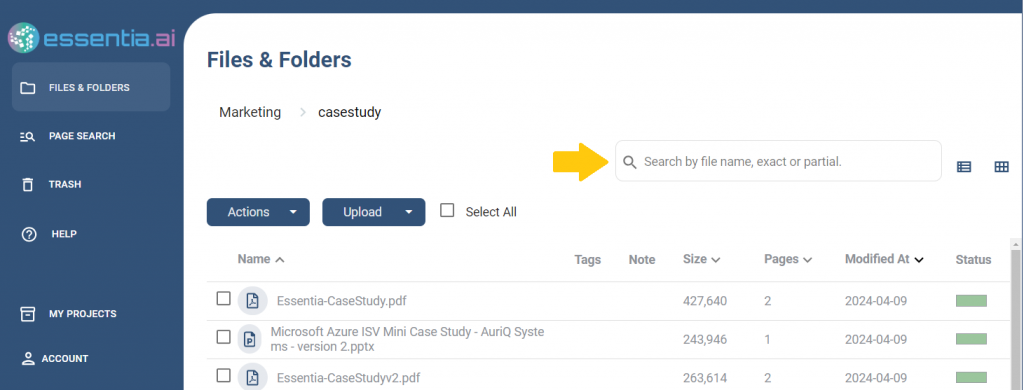
To start a search, simply enter a file name or folder name into the search bar. File searches are not case sensitive. File searches will also do partial matches so you can enter part of the file/folder name instead of the whole name. Search Results will be displayed beneath the search bar.
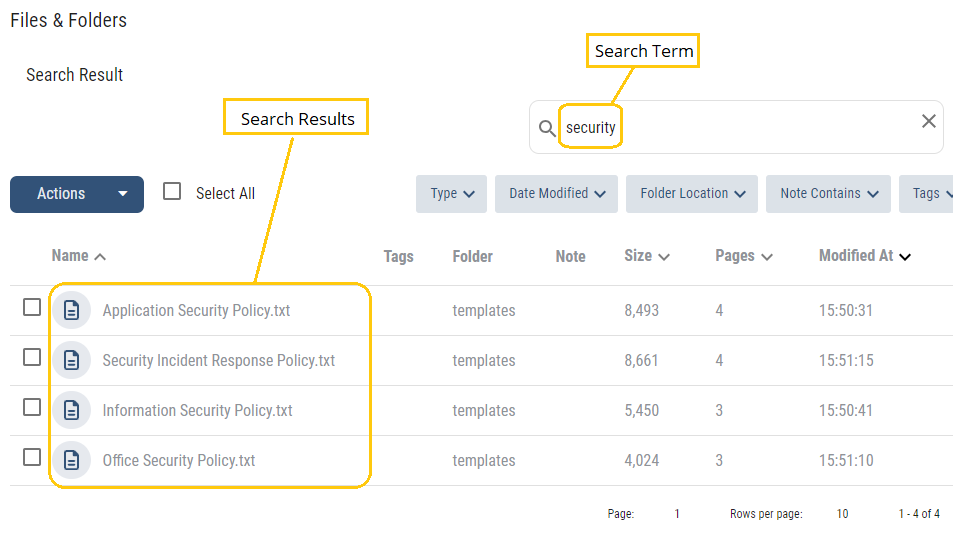
In some cases when you need to be more precise about the file(s) or folder(s) you are searching for, you can use the filtering options that appear underneath the search bar after a search has been executed.
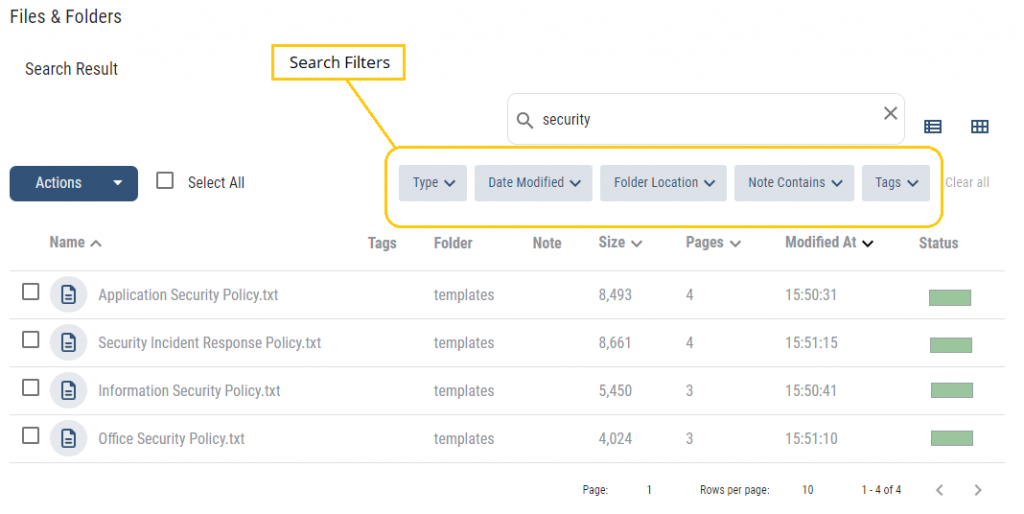
The filtering options allow you to narrow your search results based on the following:
- Type - Specific file types (e.g. - pdf, docx, jpg, png, etc)
- Date - The date type specifies what type of date item you want to narrow the search by including Uploaded and Modified. A Start and End date applied to the Date type you selected limits results to the specified range.
- Folder Location - Limit search to within selected folder.
- Note Contains - Limit results based on any notes that were added to the files or folders.
- Tags - Limit search based on any tags associated with a file or folder.
- AND/OR selector sets the search condition to match all tags selected (AND) or match any tags selected (OR). The default is OR.
- Exclude/Include selector sets the search condition to include tag matches or exclude tag matches. The default is Include
With the exception of Type, all filters are only applied once you've selected their respective Apply links. To remove or change a filter, simply click the filter to change or click on the X to remove. To start over with no filters, click on the Clear All link.
The Page Search tool allows you to search for content within your documents. To access it, click on the Page Search option from the left menu.
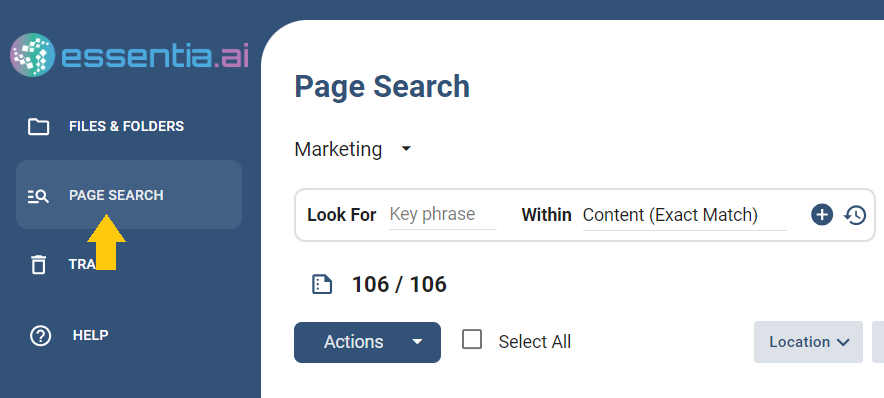
Tip: Please note that only documents that have been successfully processed will be searched. Any documents that have not been processed or were unable to be processed are excluded from search results.
Add Search Conditions
In the search bar you can enter keywords or key phrases that relate to the target information you are trying to retrieve from your documents.
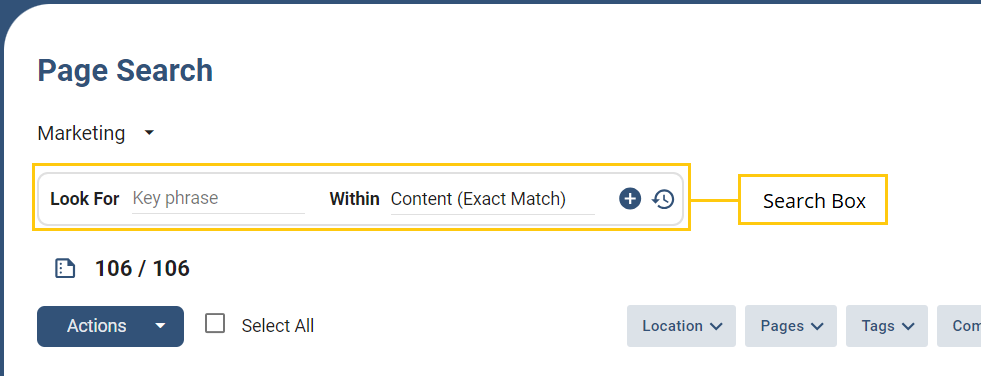
Hit enter from your keyboard or click the plus symbol to run the search. You can add multiple search terms by entering another term and hitting enter or the plus symbol. Each new term will be listed to the right of the search bar.

In addition to the search phrase to Look For, you can also specify the following from the search bar:
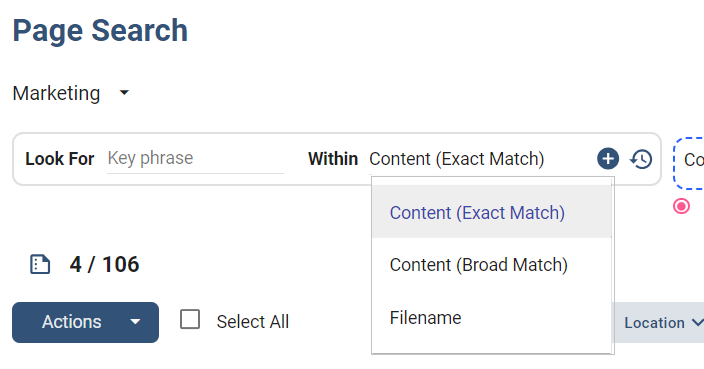
- Within - This is the drop down that allows you to specify where you want to search including:
- Content (Exact Match) - Search within the content of all document pages for match to phrase. Spelling must be exact, but case is not sensitive.
- Content (Broad Match) - Search within the content of all document pages for match to phrase. Apply fuzzy matching to look for misspelled words. Case is not sensitive.
- Filename - Search within the file name for matches to phrase.
By default Essentia AI will try to Match All the search conditions. If you want to set it to Match Any, you must select that option instead. The Don't Match option will exclude any of the search conditions from the results.
Search results will be shown below the search bar, listed by file name and page number.
Filter and Sort Options
Page Search tool lets you specify if you want to narrow the results further based on a variety of filter conditions.

Possible filtering and sort conditions include the following:
- Category (beta) - This an optional filter that is available when you select the automatic categorization setting for a project. It uses AI to categorize types of documents into predefined categories of invoice, agreement, receipt, and other.
- Location - This filter allows you to select the folder location that you want to limit the search results to. Only one folder selection is allowed at a time and you must click the Apply link to enable.
- Pages - Filter results by the page number or page ranges.
- Tags - Filter results for pages with specific tags enabled. To do this, you would click on the Tags option and select one or more of the available tags and hit the Apply link.When you filter by tags, you can also choose the following:
- AND/OR selector sets the search condition to match all tags selected (AND) or match any tags selected (OR). The default is OR.
- Exclude/Include selector sets the search condition to include tag matches or exclude tag matches. The default is Include
- Comment - Filter results based on any comments you may have added to specific page thumbnails. You simply enter part or whole of the comment text that you want to filter for and then click Apply.
- Sort By - The sorting options adjust the order of the search results. The possible options include:
- Relevance
- Date Modified
- Filename (ascending)
- Filename(descending)
Page Actions
From the search results, there are a variety of actions you can perform on the returned document pages. These actions can be limited to a single page at a time or in some cases to groups of pages.
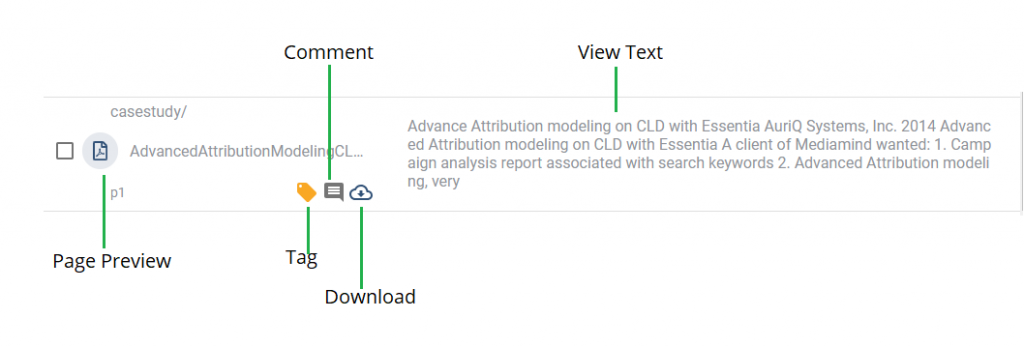
-
- Page Preview - Hover on the thumbnail to preview the enlarged image of the page. Clicking on the preview will open the document to the corresponding page.
- Tag - Tags are user defined categories that you can use to associate types of documents. It can be simple like file type (e.g. pdf, png, doc) or more descriptive like "financial, operations, research, investors". Setting up tags is covered in the projects section of this tutorial.
- Comment - This allows you to add comments to any file which can be used in future searches. This is a great way of creating ad hoc groupings of documents by labeling them.
- View Text - This will allow you to view the text extracted from the document and will highlight the target search terms as shown here. You can also copy any portion of the text to your clipboard for a variety of use cases such as filling forms.
- Download - This will download the document to your local storage.
- Page Groups -to perform actions on groups of pages you must first select two or more pages by clicking on the checkbox by the page number and opening the Actions submenu as shown in the figure below.
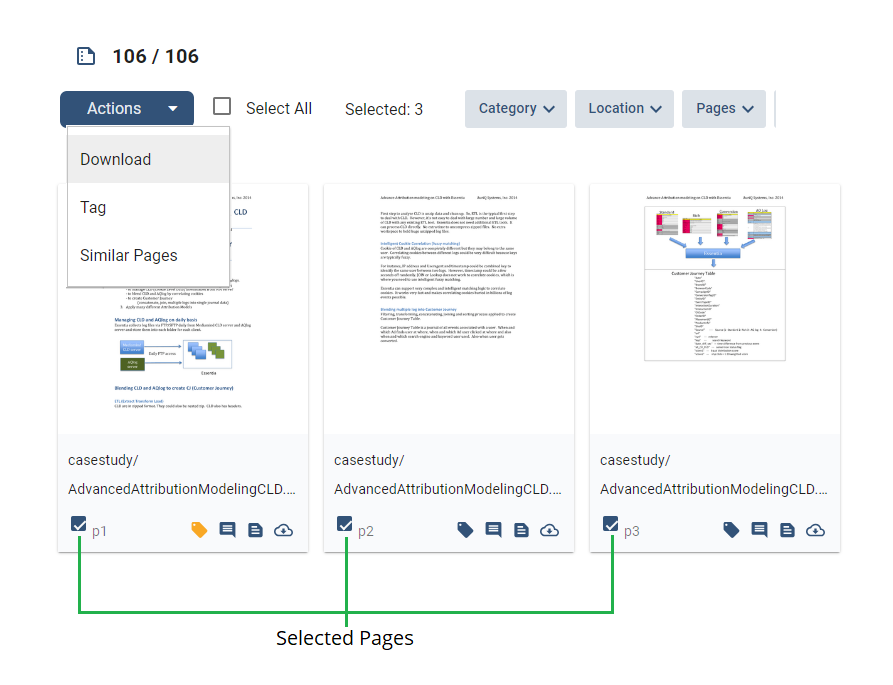
- Download - This will download all the selected documents to your local storage.
- Tag - This will allow you to apply tags to the selected documents. Tags are user defined categories that you can use to associate types of documents.
- Similar Pages - This action will perform a similar page search that analyzes the contents of the selected pages and then looks for other pages that have similar content characteristics.
Grid View & List View
You can select to view the results either in
- Grid View [
 ]
]
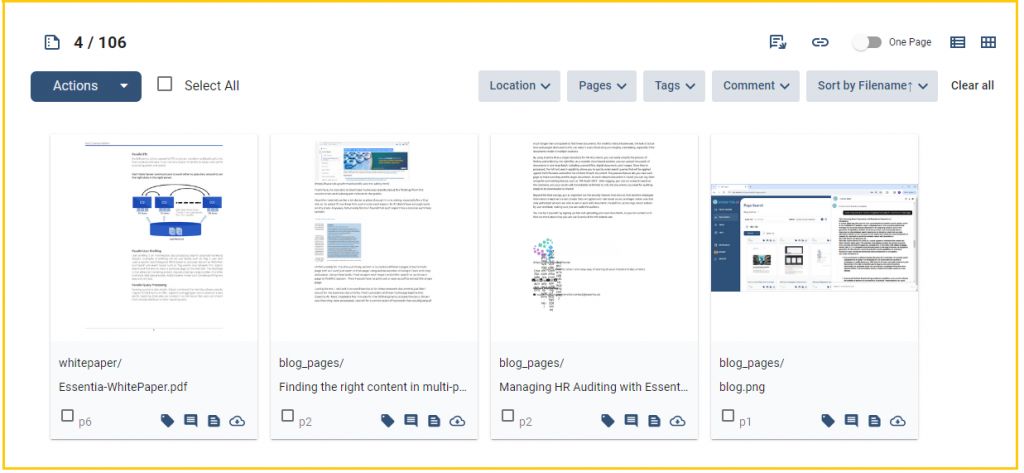
or
- List View [
 ]
]
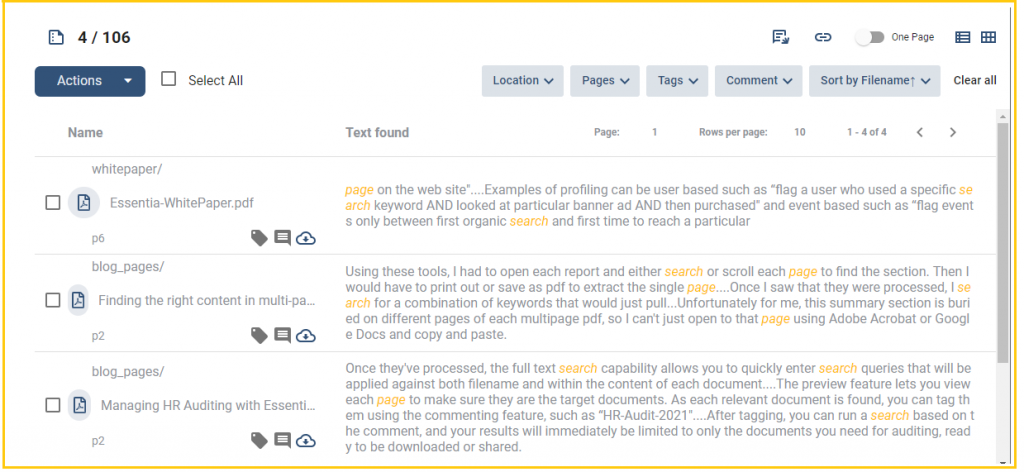
Grid View displays the search results as visual cards with thumbnail previews of the pages. List View displays the search results in list format with a preview of the text containing the search terms which are highlighted.
Share Link
The Share Link option allows users to share the results of a Page Search with other people. To use this feature, simply click on the Link icon.

This will automatically copy the link to your clipboard. You can then paste the link via email or messaging app like skype and send to your intending recipient. If the link was created from a Public Project, then users who click on the link will be taken to the Page Search results page with the same search terms, filters and other settings in place when the link was created. If the link was created from a Private Project, then users will first need to have an Essentia AI account and login before they can view the Page Search results.
One Page/All Pages Toggle
The One Page | All Pages toggle switch controls whether the Page Preview of a document page is limited to only the selected page (i.e. - one page) or to all the other pages from the document (i.e. - all pages).
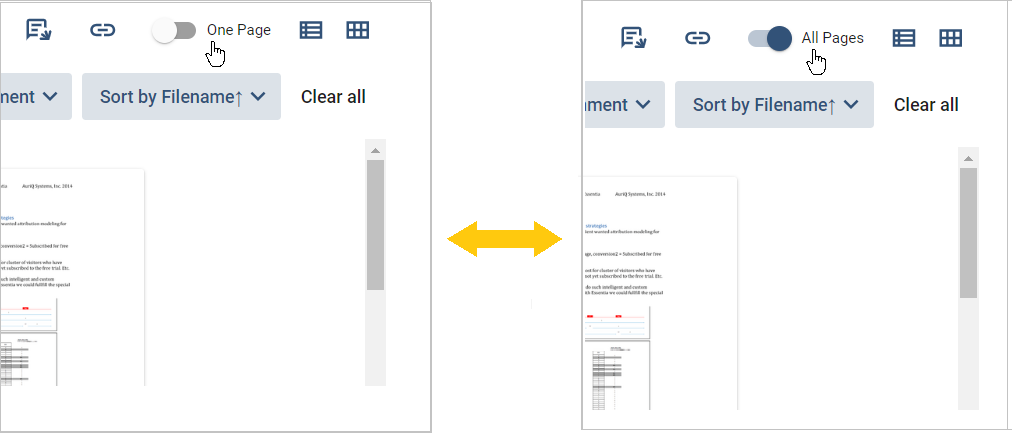
When it is set to One Page, then when you click on a page thumbnail, the preview of the page shown will be limited to only the selected page as shown below.
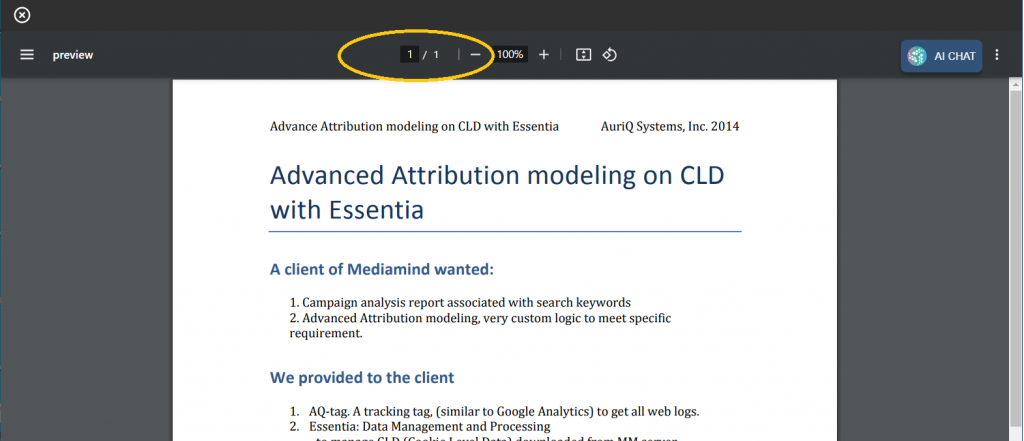
When the toggle is set to All Pages, then when you click on the same page thumbnail, the preview of the page will show the selected page but also allow you to scroll and view all the pages that are in the document.

The AI driven chat assistant is accessed by clicking on the AI Chat icon located towards the top right of the Page Search screen.
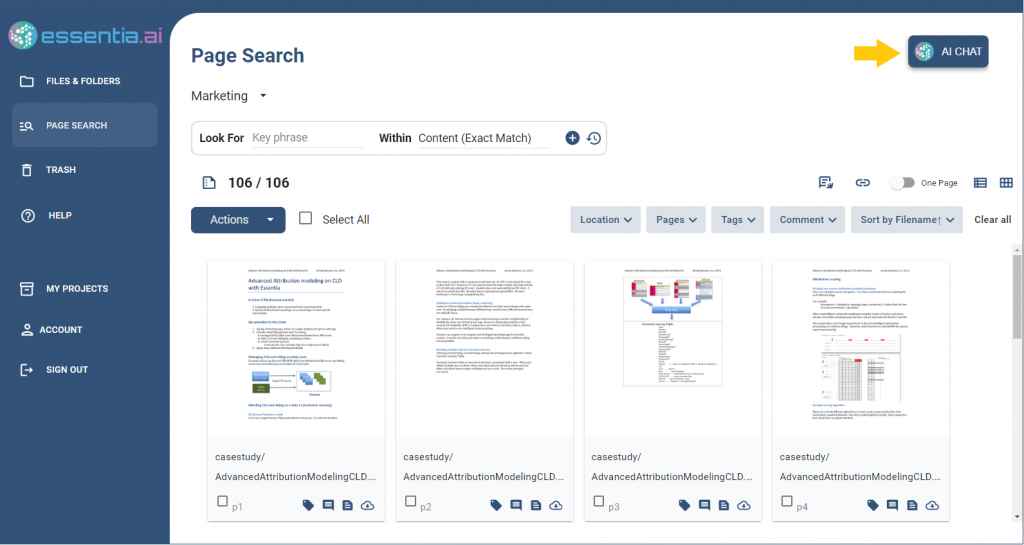
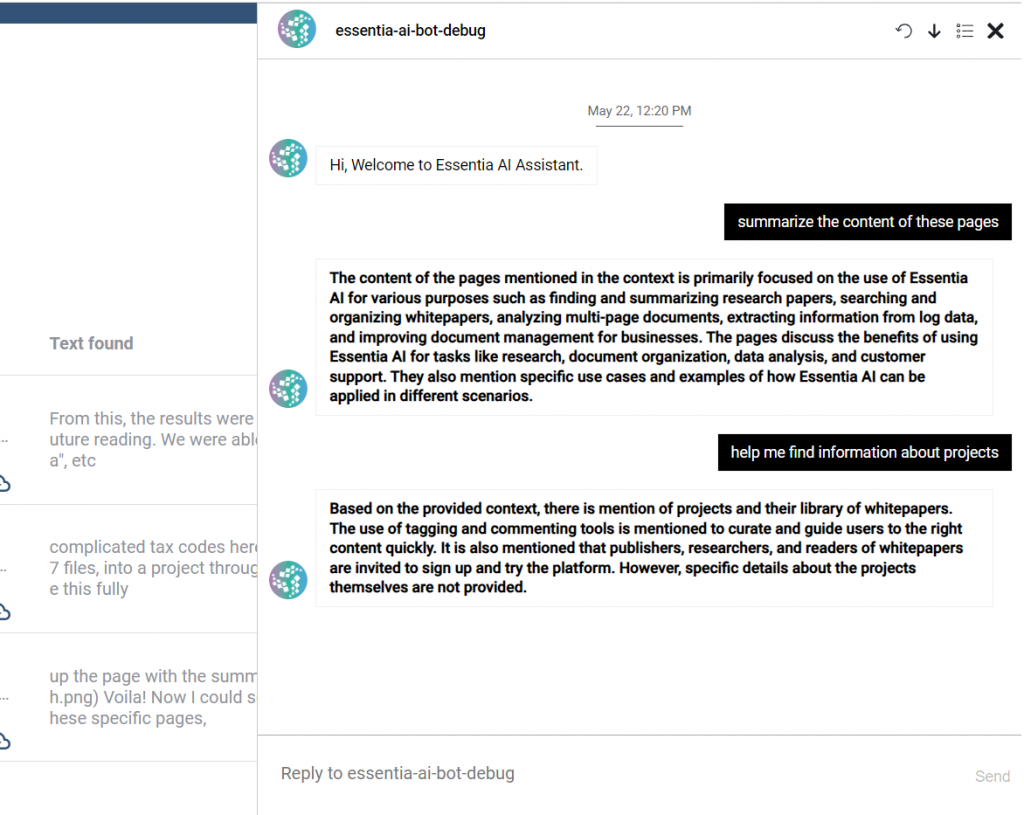
After the initial welcome prompt, you can enter questions about the documents currently included in your search results.
For example, you can ask it to “summarize the content of these pages” or “help me find information about projects”.
If an answer can be found in the content of the current Page Search result pages, then the AI assistant will return an answer derived from it. In addition, the Page Search results will update to show the Source pages from which the AI found it’s answer.
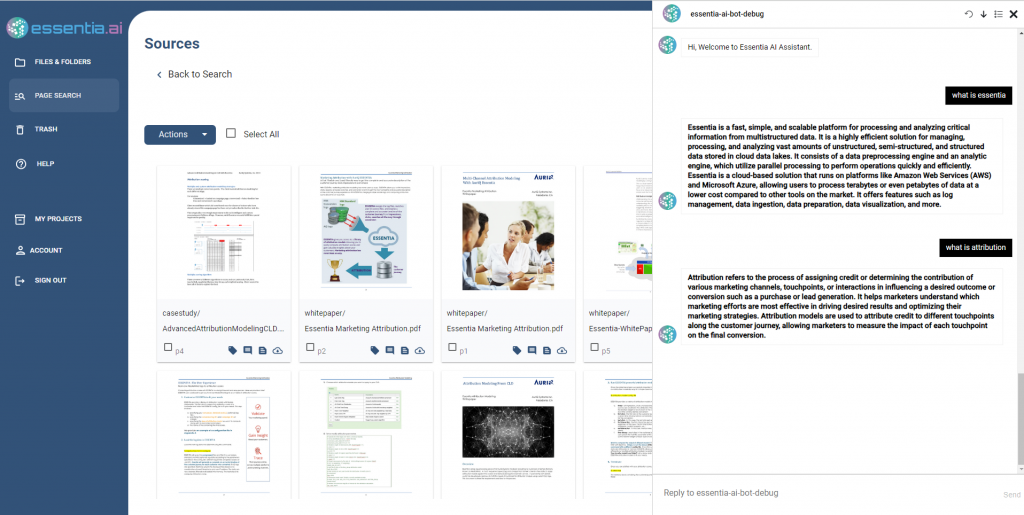
You can interact with these source pages to view, tag, comment or download as necessary.
If an answer can’t be found, then it will return something like “I don’t know” or “the text does not provide information”.
In some cases, you might want to refine the selection of source material for the AI bot to query by modifying the page search terms or using the page search filters to limit or broaden the scope of the search results. To do this you must first click the Back to Search link under the Sources title to return to the Page Search page.
After making any adjustment to the search results, you can then repose the question to the AI chat assistant and it will search for an answer in the updated source page content.
Download Conversation
You can download your current conversation with the Essentia AI assistant by clicking on the download icon. This will immediately download the conversation in a text file format to your local machine.
The primary purpose of the Account Settings feature is to allow users to change their account information including their passwords or subscription levels. To access, click on the Account option from the left menu.
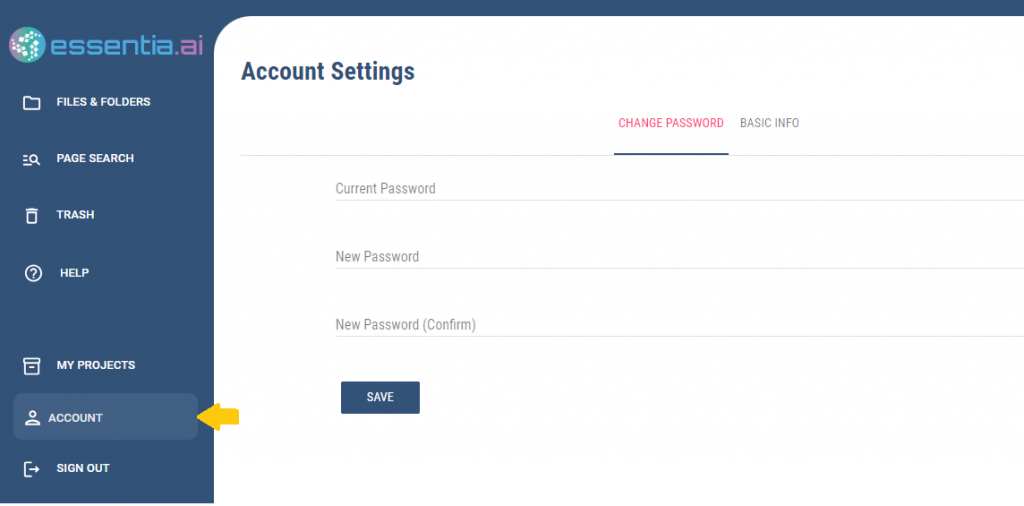
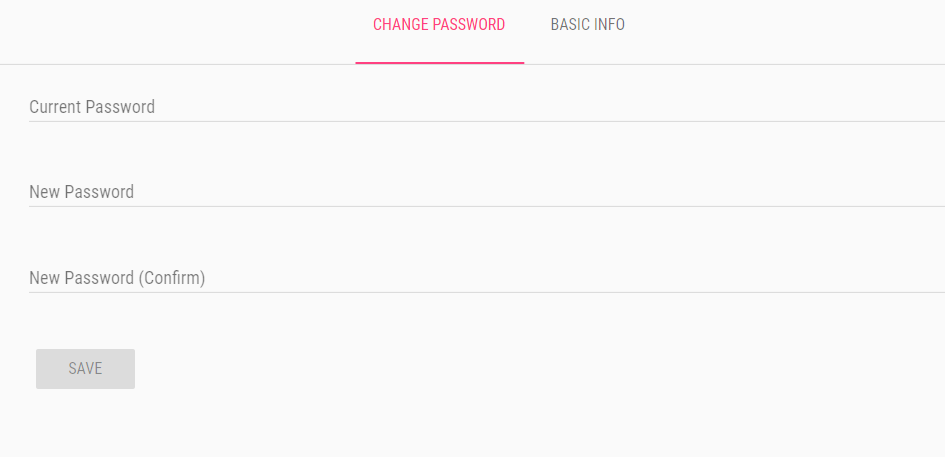
There are two available tabs labeled Basic Info and Change Password.
Change Password enables the user to change their current password to a new password at any time.
Basic Info section contains information like username, start date and email address. You can also upload a profile picture which is visible when you share projects.
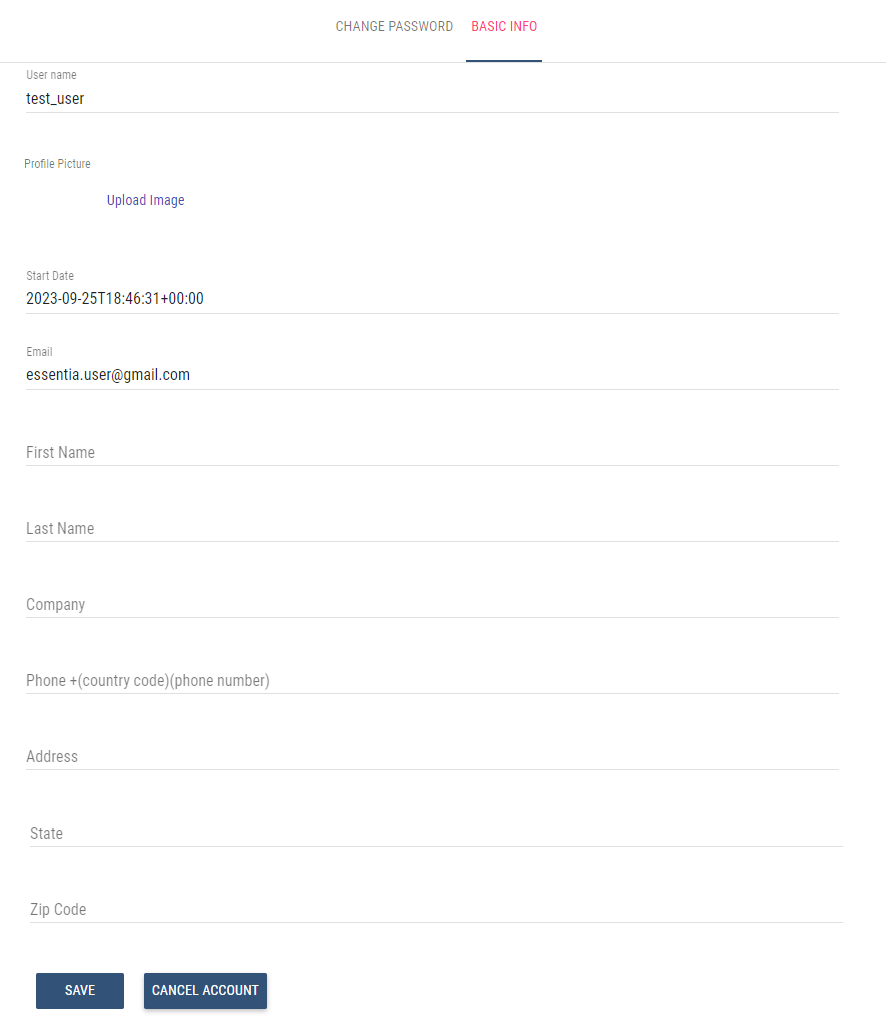
All other fields are left blank for the free level and is up to the user to enter any additional information. For paid subscription levels, it will be necessary to provide more complete basic info for billing purposes.

